
最近在开发一个基于Vue3的后台管理系统,整个项目结构参考了 vue-element-plus-admin(简称 admin),在处理页面缓存方面,它使用了 keep-alive 结合 router-view 实现,这也是大多后台系统的方向。由于 admin 的router 是一个扁平结构,故不存在缓存失效问题。而我的系统的router是个树结构,涉及多层 router-view 嵌套,这样 admin 中简单的实现就满足不了我的需求了。
如何解决多级路由缓存失效问题?是本文讨论的重点,如果你也有同我一样的烦恼,不妨读读本文😆。
小编简化系统为这几个部分组成:
- 基础布局:Layout.vue
- 路由配置:router.js
- 路由页面:Home.vue、About.vue、Theme1.vue、Theme2-1.vue、Theme3、NestRouterView.vue
方案一(树结构转扁平结构)
项目中的 routes 管理如下,很经典的树结构。根节点是一个基础布局,所有页面都基于这个布局展示。二级路由上,借助了router-view组件去承载子路由。我们给像 NestRouterView.vue 此类功能组件统称为『中间件』。
1
2
3
4
5
6
7
8
9
10
11
12
13
14
15
16
17
18
19
20
21
22
23
24
25
26
27
28
29
30
31
32
33
34
35
36
37
38
39
40
41
42
43
44
45
46
47
48
49
50
51
52
53
54
55
56
57
58
59
60
61
62
63
64
| const views = {
path: "/",
component: () => import("@/views/Layout.vue"),
children: [
{
name: "Home",
path: "",
component: () => import("@/views/Home.vue"),
meta: {
title: "首页",
keepAlive: false
}
},
{
name: "About",
path: "about",
component: () => import("@/views/About.vue"),
meta: {
title: "关于",
keepAlive: true
}
},
{
path: "",
component: () => import("@/views/NestRouterView.vue"),
children: [
{
name: "Theme1",
path: "theme/1",
component: () => import("@/views/Theme1.vue"),
meta: {
title: "主题1",
keepAlive: true
}
},
{
name: "Theme3",
path: "theme/3",
component: () => import("@/views/Theme3.vue"),
meta: {
title: "主题3",
keepAlive: false
}
},
{
path: "",
component: () => import("@/views/NestRouterView.vue"),
children: [
{
name: "Theme2-1",
path: "theme/2/1",
component: () => import("@/views/Theme2-1.vue"),
meta: {
title: "主题2-1",
keepAlive: true
}
}
]
}
]
}
]
}
|
1
2
3
4
5
6
7
8
| <template>
<router-view />
</template>
<script>
export default {
name: 'NestRouterView'
}
</script>
|
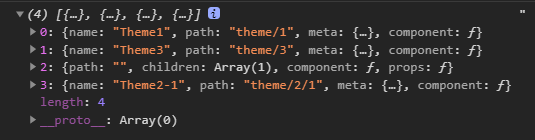
实际上是否是多级路由对于项目或者业务上来讲一点都不影响,只是界面显示需要,让用户能更快的找到自己需要的功能页面而已。这样的话,显示的路由保留多级的,实际上 router 维护成一级,将显示菜单和业务 router 分离开。放弃原有树结构,保持 router 扁平化,我们就得到了以下的 routes,不存在复杂嵌套,也不构建多余的『中间件』组件。
1
2
3
4
5
6
7
8
9
10
11
12
13
14
15
16
17
18
19
20
21
22
23
24
25
26
27
28
29
30
31
32
33
34
35
36
| const views = {
path: "/",
component: () => import("@/views/Layout.vue"),
children: [
{
name: "Home",
path: "",
component: () => import("@/views/Home.vue"),
meta: {
title: "首页",
keepAlive: false
}
},
......
{
name: "Theme1",
path: "theme/1",
component: () => import("@/views/Theme1.vue"),
meta: {
title: "主题1",
keepAlive: true
}
},
......
{
name: "Theme2-1",
path: "theme/2/1",
component: () => import("@/views/Theme2-1.vue"),
meta: {
title: "主题2-1",
keepAlive: true
}
}
]
}
|
有人说我这项目里有几十、上百条路由配置,让我手动打平,我这一天都别干活了。好办!既然『中间件』只是承载子路由功能,那我们就可以在扁平化过程中不考虑它。
1
2
3
4
5
6
7
8
9
10
11
12
| const formatRouter = (routes, newRoutes = []) => {
routes.forEach((item) => {
if (item.children && item.children.length > 0) {
formatRouter(item.children, newRoutes);
} else {
newRoutes.push(item);
}
});
return newRoutes;
};
views.children = formatRouter(views.children);
|
最终效果如下,除了首页和主题3页面都进行了缓存。
完整代码
方案二
方案一的实现直接明了,却存在很多局限性。特别是『中间件』文件(NestRouterView.vue),要是承载着业务功能,那就不能这么简单粗暴解决了。接下来我们来看看方案二的解法。
方案二的实现得力于3个函数:
- findRouterWith
- getFileNameByFunContext
- getCachesByRoutes
findRouterWith 以『中间件』组件名作为查询条件来获取所有以其作为载体的页面。
1
2
3
4
5
6
7
8
9
10
11
12
13
14
15
16
|
export const findRouterWith = (name) => {
const fn = (routes, newRoutes = []) => {
routes.forEach((item) => {
if (item.children && item.children.length > 0) {
if (getFileNameByFunContext(item.component.toString()) === name) {
newRoutes.push(item.children);
}
fn(item.children, newRoutes);
}
});
return newRoutes.flat(Infinity);
};
return fn;
};
|
由于在 router.js 中配置的 component 是一个箭头函数,我们无法直接获取『中间件』组件名,故采用通过函数内容来获取组件名。
1
2
3
4
| {
path: "/",
component: () => import("@/views/NestRouterView.vue")
}
|
component.toString()
1
2
3
| function component() {
return __webpack_require__.e(/*! import() */ 4).then(__webpack_require__.bind(null, /*! @/views/NestRouterView.vue */ "./src/views/NestRouterView.vue"));
}
|
通过观察,我们发现好提取的组件名位于双引号之间,这样我们就可以先通过提取组件路径,然后再匹配文件名。如果你有更好的写法也可以在评论区告诉我。
1
2
3
4
5
|
export const getFileNameByFunContext = (str) => {
const [file = ""] = str.match(/".+"/);
return file.replace(/(.*\/)*([^.]+).*/gi, "$2");
};
|
getCachesByRoutes 函数以路由数组入参,返回需进行缓存的一个数组。
函数先是定义了一个 children 变量来存储『中间件』,接着过滤掉路由中所有含有子集(借助了『中间件』)或是不需要缓存的项,将含有子集项的值存储于 children 中,最后的返回值是由已过滤路由和『中间件』集组成。
1
2
3
4
5
6
7
8
9
10
11
12
13
14
15
16
17
18
19
20
21
22
23
|
export const getCachesByRoutes = (routes = []) => {
const children = [];
const caches = routes
.filter((o) => {
if (o.children) {
children.push(o.component);
}
return !o.children && o.meta.keepAlive;
})
.map((o) => o.name);
if (children.length > 0) {
children.forEach((fun) => {
caches.push(getFileNameByFunContext(fun.toString()));
});
}
return [...new Set(caches)];
};
|
以『中间件』(NestRouterView.vue)为例,此时的 NestRouterView 不仅仅是容器,还承载功能。首先,我们看 router.js 文件,routes 比原来多了层嵌套,情况也就更复杂;接着 findRouterWith 获取以 NestRouterView 为父组件的所有路由,最后通过 getCachesByRoutes 来获取需在本组件进行缓存的数组。
router.js
1
2
3
4
5
6
7
8
9
10
11
12
13
14
15
16
17
18
19
20
21
22
23
24
25
26
27
28
29
30
31
32
| const routes = [
{
path: "/",
component: () => import("@/views/Layout.vue"),
children: [
......
{
path: "",
component: () => import("@/views/NestRouterView.vue"),
children: [
......
{
path: "",
component: () => import("@/views/NestRouterView.vue"),
children: [
{
name: "Theme2-1",
path: "theme/2/1",
component: () => import("@/views/Theme2-1.vue"),
meta: {
title: "主题2-1",
keepAlive: true
}
}
]
}
]
}
]
}
];
|
NestRouterView.vue
1
2
3
4
5
6
7
8
9
10
11
12
13
14
15
16
17
18
19
20
21
22
23
24
25
26
27
28
29
30
31
| <template>
<div>
<fieldset>
<button @click="goBack">返回</button>
</fieldset>
<router-view v-slot="{ Component }">
<keep-alive :include="caches">
<component :is="Component" />
</keep-alive>
</router-view>
</div>
</template>
<script>
import { routes } from "@/router";
import { findRouterWith, getCachesByRoutes } from "@/utils";
export default {
name: "NestRouterView",
setup() {
const target = findRouterWith("NestRouterView")(routes);
const caches = getCachesByRoutes(target);
const goBack = () => window.history.back();
return {
caches,
goBack,
};
},
};
</script>
|

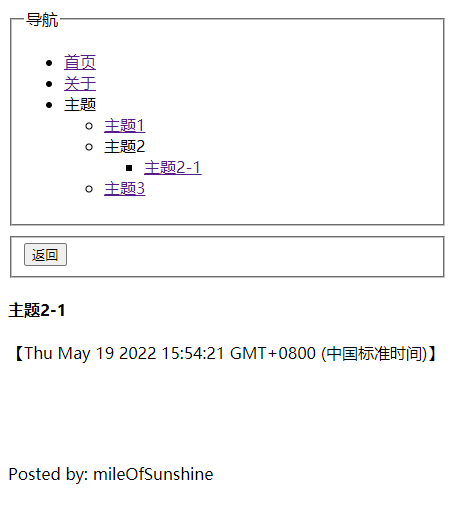
最终效果如下,除了首页和主题3页面都进行了缓存。但有个地方比较怪异,就是主题2-1页面出现了两个 【返回】功能。那是因为 NestRouterView 嵌套所致,你可以通过设置 prop 的方式来达到页面统一。
1
2
3
4
5
6
7
8
9
10
| {
name: "Theme2-1",
path: "theme/2/1",
component: () => import("@/views/Theme2-1.vue"),
props: () => ({ showBackBtn: false }),
meta: {
title: "主题2-1",
keepAlive: true
}
}
|
1
2
3
4
5
6
7
8
9
| export default {
name: "NestRouterView",
props: {
showBackBtn: {
type: Boolean,
default: true,
},
},
}
|
完整代码
小结
方案一是目前互联网中最常见的解法,个人觉得还是存在较大的局限性。方案二是小编在项目开发过程中摸索出的解法,可扩展行强。强推!!!若你还有更好的方案,可分享于我。
若你在使用 keep-alive 中有疑惑,可移步姊妹篇《看keep-alive如何在项目中失效》
看过姊妹篇的朋友可能记得小编说过,vue-router 的 name 属性是用于路由跳转,不是用于 keep-alive,但在本文的方法却取了 vue-router 的 name 用于 include 中。这是因为小编统一了组件和 vue-router 的 name,更有利于项目的维护。
本文作者: mileOfSunshine
本文链接: https://mileofsunshine.github.io/2022/05/19/2022-05-19-keep-alive/
版权声明:文章是原创作品。转载请注明出处!